Up until recently I was searching the interweb for places in
South Africa that offered rally driving courses. I managed to
find one place but they were up in Pretoria and I was even thinking
about making a plan to go there when I visited Gauteng again.
The only thing Cape Town had to offer was Fantastic Racing which
is great but it’s not what I was looking for at the time.
All this changed when my good buddy Ernest Page told me that
he is opening a Stunt and Rally School! Whoohoo! It was time
to beat around the bush... LiteRALLY!
I immediately said he should book me a seat. Unfortunately the
response was so overwhelming for Ernest and being the good friend
that I am I let him sort his new customers out first. I didn’t
mind waiting. But after a few weeks I started to grow more and
more impatient as I was hearing about all the great feedback
from satisfied customers, I just couldn’t wait any longer.
I nagged Ernie until he eventually decided to set a whole session
aside just for me! I went from impatient to anxious! I couldn’t
wait!
Stunt and Rally School is based deep into the northern suburbs
and well beyond the “boerewors curtain” out in the
farmlands of Durbanville. It was a bit of a trek for a southern
suburbs guy like me but it proved to be well worth it! Arriving
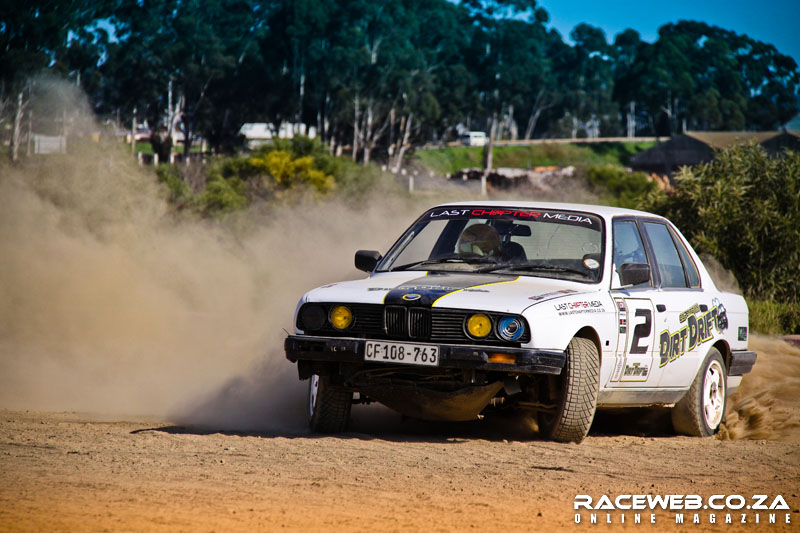
at the venue, Dirt and Dust, I was greeted by two E30 325i BMW’s
sitting on a fairly large open gravel area. The stage was set!
After the mandatory meet and greet we headed straight into the
drivers briefing where Ernest explained all sorts of things
from the do’s and don’ts of the vehicles, safety,
driving technique and implementation.
My weapon, or missile as Ernest calls it, was the white 325i,
because it’s got more stickers… and we all know
how much faster stickers make you! But this wasn’t a game
of speed. It’s all about honing your own skill levels,
finding your personal limit and improving on them making you
an overall better driver.
To some people the car may not look like much, but with a 130kw’s
on dirt, it’s a whole other ball game! As I found out
it was plentiful!
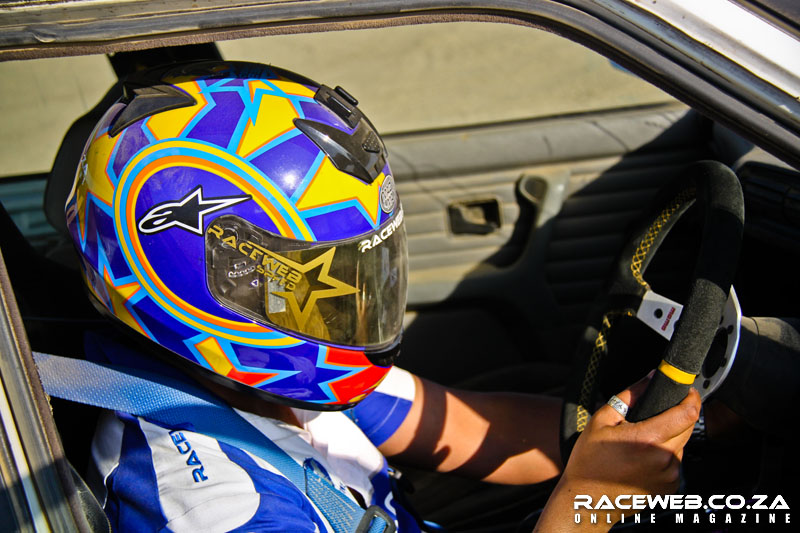
As I got into the car I was strapped into the bucket seat with
a racing harness and immediately greeted by a deep dish rally
style steering wheel. This looks like the business! Wait a minute,
there’s a drift/rally style hydraulic hand brake too!
I’m going to feel just like Sebastian Loeb today! Freaken
awesome!
Strapped in, helmet on, I turn the ignition and hear that distinct
straight 6 BMW sound. That coupled with a free flow exhaust
makes for great listening pleasure. Ernest starts you off with
the basics: A simple handbrake turn. It’s great because
even though I’ve done this maneuver plenty times before,
it gets you used to the car’s rear end sliding around.
Since that’s primarily what you’re going to be doing
all day, it’s a crucial learning curve for beginners.
Give it some revs, release the clutch and drive towards the
cone. Turn hard and yank the handbrake. The car slides around
and performs a 90 degree turn. Easy peasy. I must mention that
if you’re not used to driving on gravel it can be a little
unnerving at first because the steering wheel has very little
weight. It’s not that the front tyres didn’t have
any grip, it’s just very light. Get it wrong and you will
understeer till next Wednesday. I did that a couple more times
and I was soon moving on to the next maneuver. The 180 degree
handbrake turn.
This is essentially the same as the first move, but it involves
holding the handbrake for a longer period of time making the
car slide more. The point is to get the car facing in the complete
opposite direction from which you came.
After doing that a few times I moved on to the next step. A
180 turn but instead of using the hand brake, I had to use the
cars own power to bring it around. I parked the car next to
a cone, turned the wheel a bit, gave it a few revs and dropped
the clutch. This spins the rear wheels and points the car in
the opposite direction. It does involve a little bit of counter
steer to get the car pointed in the required direction.
Moving on! The next step is a little trickier. It involves both
previous maneuvers. It’s essentially still a 180 turn
but now you have to use the handbrake to initiate the rear end
to slide and then power out to point you in the opposite direction.
Doing that a few times I learnt how to combine two steps into
one and build on what I’ve just learnt. Ernest eventually
encourages me to make the radius bigger and hang the tail out
as much as possible for the most dramatic sideways angles possible.
Next step. And this is what most people come here for: The big
slide! Yep, this is drifting basics right here. Ernest explains
how to do a big circle and ways to keep it sideways for as long
as possible. But here comes the fun part. I have to initiate
this drift with the handbrake. Just like pro drifters! I pull
away slowly and change to second gear to get the speed up. By
the way, believe it or not, but this is one driving course where
the instructor urges you to go faster! Usually it’s the
other way around! I get to the cone, pull the handbrake, give
the wheel a bit of turn and I feel the rear end sliding out.
Initiation done! Now to keep it sliding. On the power, not too
much, I don’t want to spin out. Feed the throttle and
feel the car maintaining the slide. Eventually the revs start
to drop a little and the car feels like it wants to straighten
out. I give it more right foot and instantly feel the rear end
stepping out again. Awesome!
The more throttle you give the more angle you achieve, but careful
now because if you give it too much the car will spin out. But
here’s the cool part. Because this is on gravel, there
is a lot of forgiveness from the car. There was a few times
where I got massive full opposite lock angle and thought I’m
definitely going to spin out, but I didn’t. Why? Well
while you’re sliding the rear wheels are digging into
the gravel and the tyres are getting pushed up against it creating
a wall. Kind of like Newton’s first law, but the gravel
drifting version! Don’t get me wrong, give it way too
much and it will spin out!
We take a break and chat about what I’ve done thus far.
It’s good because it gives your mind and body a break
and you are then able to digest what all just happened as well
as what’s yet to come.
Moving on I proceed to something less technical but very rewarding
and fun. It’s something I just mastered, it’s the
handbrake turn but now it needs to be placed inside a 4 cone
box. Something like that old Continental Tyre advert on the
roof of a building. Bring on the handbrake park!
Pulling away from the starting point I change to second gear
to bring up the speed once more. Not enough speed and the car
won’t slide deep enough into the box. Too much speed and
it will slide right through. The use of the handbrake is vital
here because it determines how aggressive the park is. The longer
you are on the handbrake the more angle you get, but too much
and you will see yourself pointing in the wrong direction. This
maneuver is key because it ties up to the final stage of the
day which is a combination of all the techniques I will learn
in a mini gymkhana course. I will need to end off in a handbrake
park. So getting this right will score me big points with Ernest.
I do a few practice runs and eventually I bang it into the box!
There’s two ways of doing this. One way is to point the
car straight at the box, turn and pull. Or, start sliding the
car from a distance and then pull the handbrake which means
you end up drifting into a “parking spot”. I much
preferred the latter simply because it was more fun… and
looked cooler too!
That was fun! Now to the next step. The infamous figure 8. I’ve
attempted this before when I tested out Dylan
Cothills Drift machine. I didn’t exactly
master it; in fact it was far from perfect. But that’s
another story. Now was my chance to prove to myself that I can
do it! I came here today planning to get this move right.
I pull up and park the front wheel of the car next to a cone.
Turn the steering a bit and wait for the dust to settle. I can
do this! I know how to do it; I just need to apply it. Rev it
up and drop the clutch. The back wheels spin and the rear starts
to slide. I need to slide the car around to a 270 degree angle
almost, not 180. 180 won’t be enough to make the next
part of the figure 8 and I will only understeer the rest of
the way. This part takes getting used to, because it feels as
if I was going to spin out and not make the second half, but
once I got it to that point, I just let off the throttle and
grabbed the steering wheel (the steering counter steers by itself,
all you have to do is let go and catch it at the correct time).
Once I felt the back starting to straighten out I got back on
the throttle and spun it around the second cone completing the
figure of 8. Man that was awesome! Let’s do it again!!
Doing a few more figure of 8’s I got to master the maneuver
and after taking a short breather once more it was time to move
onto the final stage, the gymkhana course! As mentioned earlier
this would combine everything I just learnt and I would have
to apply it all in one go. It’s not easy for some people
to do this as they end up buckling trying to remember everything
all at once. But I was up for the challenge!
I got two chances to do this. I am going to be judged on both
runs. I could either be cautious on the 1st run to get some
points in the bag or just go balls to the wall and see how I
end up. What should I do…?! Balls to the wall people!
Ride or die! Haha. Ok I’m exaggerating just a tad but
trust me these are the kind of thoughts that was flying through
my head when I was sitting in that bucket seat as Ernest was
counting me down. I decided not to stress over it and just do
what I was comfortable with. 3, 2, 1… GO! I gave it some
revs and released the clutch, slip it into second gear and aim
for that first cone. Keep it straight! I don’t want to
be sliding around all over the place when I need to concentrate
on pulling the handbrake. Pull the lever, slide, throttle, slide,
hang the tail out… boom! Handbrake turn and slide done!
Reset. Second gear, aim for the cone once more, pull the handbrake,
slide, keep it there, throttle, drift! Whoohoo! Reset. Figure
of 8. Pop the clutch, slide, swing it all the way around, slide,
counter steer, slide, rev it up, slide some more! Figure of
8’s done! Now to finish off in style. Drive the car towards
the box, keep it neat… turn hard and pull… into
the box! Boom! I feel like such a pro!
Not to sound too full of myself but I think I banged out two
solid runs. Even Ernest said I was one of his best students
thus far! What an awesome experience it was. To some this might
not seem like a lot, but trust me there’s only so much
one can ingest at a time. This course is perfect for the beginner
to intermediate driver. If you own a rear wheeled drive car,
or even if you don’t, this session is perfect for you!
You end up learning so much and have the freedom to do it in
a safe environment with someone else’s car! What more
could you ask for?! I would highly recommend this to EVERYONE!!!
This Dirt Drift course is just the beginning stage, there will
be more advanced courses available later on. If you’re
keen to find out more about this or book a seat, feel free to
contact Ernest
Page or visit www.stuntandrally.co.za
Till next time, keep it sideways!
RaceMasteR J
Watch the video of me below doing some of the stunts for
an idea of what's it all about...